Reasons to Choose Our Oracle 1Z0-1065-23 Exam Dumps
Oracle 1Z0-1065-23 Exam Dumps - Curated by Subject Matter Experts
Are you tired of getting Oracle 1Z0-1065-23 dumps with wrong answers? Don’t worry now because our Oracle Fusion Cloud Procurement 2023 Implementation Professional exam dumps are curated by subject matter experts ensuring every question has the right answer
Prepare Your Exam with Oracle 1Z0-1065-23 Dumps on Any Device
We facilitate you by offering our Oracle 1Z0-1065-23 exam dumps in three different formats (PDF file, Offline, and Online Practice Test Software)
Self-Assess Your Oracle Cloud Exam Preparation
Self-Assess Your Oracle 1Z0-1065-23 exam preparation with our 1Z0-1065-23 dumps enriched with various features such as time limit, personalized result page, etc

Eliminate Risk of Failure with Oracle 1Z0-1065-23 Exam Dumps
Schedule your time wisely to provide yourself sufficient time each day to prepare for the Oracle 1Z0-1065-23 exam. Make time each day to study in a quiet place, as you'll need to thoroughly cover the material for the Oracle Fusion Cloud Procurement 2023 Implementation Professional exam. Our actual Oracle Cloud exam dumps help you in your preparation. Prepare for the Oracle 1Z0-1065-23 exam with our 1Z0-1065-23 dumps every day if you want to succeed on your first try.
Challenge 7
Manage Qualification Areas
Scenario
Your procurement organization needs to group and organize qualification questions into a hierarchical structure.
Task
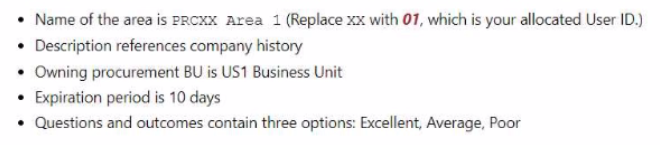
Create an active Qualification Area to hold the qualification question created previously, where:
. Name of the area is PRCXX Area 1 (Replace xx with 01, which is your allocated User ID.)
. Description references company history
. Owning procurement BU is US1 Business Unit
* Expiration period is 10 days

See the explanation below.
Task 7: Create a Qualification Area for Supplier Questions
Following the scenario, we need to create a new Qualification Area in Oracle Procurement Cloud named 'PRCXX Area 1' (replace xx with 01) to organize the previously created supplier question.
Here are the steps to create the Qualification Area:
Navigate to Manage Qualification Areas:
Go to the Global Navigation Menu.
Click onProcurement.
Click onSetup and Maintenance.
Click onSupplier Qualification.
Click onAreas.
Create the Qualification Area:
Click on theCreateicon (+ icon).
Enter the Qualification Area Information:
Name:Enter 'PRCXX Area 1' (replace xx with 01).
Description:Enter a brief description,such as 'Company History and Experience'.
Owning Procurement BU:Select 'US1 Business Unit'.
Expiration Period:Enter '10' in the Days field.This defines how long a supplier's responses will be valid before requiring re-evaluation.
Default Qualification Owner:(Optional) Select a user who will be automatically assigned as the owner for newly created qualifications associated with this area.
Active:Select 'Yes' to activate the area.
Add Qualification Questions:
Click on theQuestions and Outcomesicon.
Select the previously created supplier question 'PRCXX Q1' (replace xx with 01).
Click on theAddicon (+ icon) to add it to the area.
Define Outcomes:
Click on theOutcomestab.
Click on theCreateicon (+ icon) to define possible outcomes for the area.
Enter three outcome options:
Excellent
Average
Poor
Assign a score or weight to each outcome if desired.
Save the Qualification Area:
Click on theSavebutton.
Verification:
The Qualification Area 'PRCXX Area 1' (replace xx with 01) should now be listed in the Manage Qualification Areas page.
You can verify the area details,description,and associated supplier question by clicking on it.
The owning procurement BU,expiration period,default owner,active status,and defined outcomes should be displayed as specified above.
Additional Notes:
Make sure to replace 'xx' with your allocated User ID (01) in the area name for consistent naming convention.
The expiration period determines how often suppliers need to update their information for this area.
Adding a default qualification owner simplifies the assignment process for new qualifications.
Defining outcomes allows you to evaluate the responses to the qualification questions and assign scores or weights based on their performance.
Challenge 6
Manage Supplier Questions
Scenario
Your procurement organization needs to create a Qualification Question that will be communicated to potential suppliers as part of an onboarding process.
Task
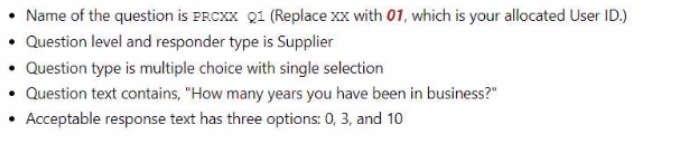
Create an active Qualification Question, where:
. Name of the question is PRCXX Q1 (Replace xx with 01, which is your allocated User ID.)
. Question level and responder type is Supplier
* Question type is multiple choice with single selection
. Question text contains, "How many years you have been in business?"
See the explanation below.
Task 6: Create a Qualification Question for Suppliers
Following the scenario, we need to create a new Qualification Question in Oracle Procurement Cloud named 'PRCXX Q1' (replace xx with 01) to assess potential suppliers' years in business.
Here are the steps to create the Qualification
Question= 01
Navigate to Manage Supplier Qualification Questions:
Go to the Global Navigation Menu.
Click onProcurement.
Click onSetup and Maintenance.
Click onSupplier Qualification.
Click onQuestions.
Create the Qualification
Question= 01
Click on theCreateicon (+ icon).
Enter the Qualification Question Information:
Name:Enter 'PRCXX Q1' (replace xx with 01).
Question Level:Select 'Supplier'.
Responder Type:Select 'Supplier'.
Question Type:Select 'Multiple Choice - Single Select'.
Question Text:Enter 'How many years have you been in business?'.
Required:(Optional) Select 'Yes' if suppliers must answer this question.
Active:Select 'Yes' to activate the question.
Define Acceptable Responses:
Click on theAddicon (+ icon) to add new response options.
Enter the following response options:
0
3
10
Save the Qualification
Question= 01
Click on theSavebutton.
Verification:
The Qualification Question 'PRCXX Q1' (replace xx with 01) should now be listed in the Manage Supplier Qualification Questions page.
You can verify the question details and acceptable responses by clicking on it.
The question level,responder type,question type,text,required status,and active status should be displayed as specified above.
The acceptable responses should include 0,3,and 10 years.
Additional Notes:
Make sure to replace 'xx' with your allocated User ID (01) in the question name for consistent naming convention.
Selecting 'Multiple Choice - Single Select' limits suppliers to choosing one answer.
You can add additional acceptable responses if needed.
Activating the question makes it visible to suppliers during the qualification process.
Challenge 5
Manage Procurement Agents
Scenario:
Your procurement organization requires you to define yourself as a purchasing buyer so that you can create and manage procurement transactions.
Task
Define a Procurement Agent, where:
* Procurement BU is US1 Business Unit
. Agent is mapped to your assigned Login username - Student, PRCXX (Replace xx with 01, which is your allocated User ID.)
* All default procurement actions are to be assigned and accepted as-is
See the explanation below.
To define a Procurement Agent, you can follow these steps:
Navigate to the Setup and Maintenance work area and search for the Manage Procurement Agents task.
Click on the Go to Task icon to open the Manage Procurement Agents page.
Click on the Create icon to create a new procurement agent.
Enter the following information in the Create Procurement Agent dialog box:
Procurement Business Unit: US1 Business Unit
Agent: Student, PRC01
Procurement Actions: Select all the check boxes to assign all the default procurement actions
Click on the Save and Close button to save the procurement agent.
Or the following steps:
Following the scenario, we need to define you (Student, PRCXX) as a Procurement Agent with access to manage procurement transactions in the US1 Business Unit.
Here are the steps to define the Procurement Agent:
Navigate to Manage Procurement Agents:
Go to the Global Navigation Menu.
Click onProcurement.
Click onSetup and Maintenance.
Click onProcurement Agents.
Create the Procurement Agent:
Click on theCreateicon (+ icon).
Enter the Procurement Agent Information:
Procurement BU:Select 'US1 Business Unit'.
Agent:Enter your assigned Login username - 'Student,PRCXX' (replace xx with 01).
Requisitioning BU:(Optional) You can select a specific Requisitioning Business Unit if you primarily handle requests from that unit.Otherwise,leave it blank.
Default Procurement Actions:Select 'Use Defaults'.This assigns all default procurement actions (create purchase orders,issue requisitions,etc.) to you.
Save the Procurement Agent:
Click on theSavebutton.
Verification:
You should now be listed as a Procurement Agent in the Manage Procurement Agents page.
You can verify your assigned actions and Business Units by clicking on your record.
You should be able to create and manage procurement transactions within the US1 Business Unit.
Additional Notes:
Make sure to replace 'xx' with your allocated User ID (01) in the Agent field for accurate identification.
Selecting 'Use Defaults' assigns all standard procurement actions to you.You can customize these actions later if needed.
Remember that your access level and permissions within the Procurement module will be determined by your Procurement Agent role and associated Business Units.
Challenge 4
Manage Inventory Organizations
Scenario:
Your procurement organization requires you to create an inventory organization, which will be used for issuing and receiving procurement transactions.
Task:
Create an Inventory Organization to receive procurement transactions, where:
. Name of the organization is PRCXX Organization (Replace xx with 01, which is your allocated User ID.)
. Organization code is PRCXXORG (Replace xx with 01, which is your allocated User ID.)
. Organization is linked to US1 Business Unit, US1 Legal Entity, and Redwood City - CA location
. Item Master Organization is linked to Operations
. Item Grouping Behavior is set to Definition Organization
. Schedule is set to Operations

See the explanation below.
To create an Inventory Organization to receive procurement transactions, you can follow these steps:
Navigate to the Setup and Maintenance work area and search for the Manage Inventory Organizations task.
Click on the Go to Task icon to open the Manage Inventory Organizations page.
Click on the Create icon to create a new inventory organization.
Enter the following information in the Create Inventory Organization dialog box:
Name: PRC01 Organization
Code: PRC01ORG
Business Unit: US1
Legal Entity: US1
Location: Redwood City - CA
Item Master Organization: Operations
Item Grouping Behavior: Definition Organization
Schedule: Operations
Click on the Save and Close button to save the inventory organization.
Or use the following steps:
Following the scenario, we need to create a new Inventory Organization in Oracle Procurement Cloud named 'PRCXX Organization' (replace xx with 01) to receive procurement transactions.
Here are the steps to create the Inventory Organization:
Navigate to Manage Inventory Organizations:
Go to the Global Navigation Menu.
Click onSupply Chain.
Click onSetup and Maintenance.
Click onInventory Organizations.
Create the Inventory Organization:
Click on theCreateicon (+ icon).
Enter the Inventory Organization Information:
Name:Enter 'PRCXX Organization' (replace xx with 01).
Organization Code:Enter 'PRCXXORG' (replace xx with 01).
Business Unit:Select 'US1 Business Unit'.
Legal Entity:Select 'US1 Legal Entity'.
Location:Select 'Redwood City - CA'.
Item Master Organization:Select 'Operations'.
Item Grouping Behavior:Select 'Definition Organization'.
Schedule:Select 'Operations'.
Description:(Optional) Enter a brief description of the inventory organization.
Define Item Sourcing Details:
Click on theItem Sourcing Detailstab.
Click on theCreateicon (+ icon).
Enter the item sourcing details for your organization,including:
Picking Defaults
Inventory Lead Time
Supply Subinventory
Shipping Rules
Click on theSave and Closebutton.
Save the Inventory Organization:
Click on theSavebutton.
Verification:
The Inventory Organization 'PRCXX Organization' (replace xx with 01) should now be listed in the Manage Inventory Organizations page.
You can verify the details of the organization by clicking on it.
The linked Business Unit,Legal Entity,Location,Item Master Organization,Item Grouping Behavior,and Schedule should be displayed as specified above.
Additionally,the Item Sourcing Details should reflect the defined values for picking,lead time,subinventory,and shipping rules.
Additional Notes:
Make sure to replace 'xx' with your allocated User ID (01) in both the Inventory Organization name and code for consistent naming convention.
The Item Master Organization defines the organization responsible for managing item information.
The Item Grouping Behavior determines how items are grouped for inventory purposes.
The Schedule defines the calendar used for scheduling inventory transactions.
Carefully review and configure the Item Sourcing Details to ensure proper receipt and fulfillment of procurement transactions within your organization.
Challenge 3
Manage Purchasing Line Types
Scenario:
Your business unit requires a new line type for purchasing transactions.
Task3:
Create a new Purchasing Line Type, where:
. Name of the line type is PRCXX Computer Goods (Replace xx with 01, which is your allocated User ID.)
* Code is PRCXXCOMP
. Purchase basis is quantity-based for the Goods product type
. Line type is linked to the Computer Supplies category
. Unit is Ea

See the explanation below.
To create a new Purchasing Line Type, you can follow these steps:
Navigate to the Setup and Maintenance work area and search for the Manage Purchasing Line Types task.
Click on the Go to Task icon to open the Manage Purchasing Line Types page.
Click on the Create icon to create a new line type.
Enter the following information in the Create Line Type dialog box:
Name: PRC01 Computer Goods
Code: PRC01COMP
Purchase Basis: Quantity
Product Type: Goods
Category: Computer Supplies
Unit of Measure: Ea
Click on the Save and Close button to save the line type.
Or use the following:
Following the scenario, we need to create a new Purchasing Line Type in Oracle Procurement Cloud named 'PRCXX Computer Goods' (replace xx with 01) for purchasing computer supplies.
Here are the steps to create the Purchasing Line Type:
Navigate to Manage Purchasing Line Types:
Go to the Global Navigation Menu.
Click onProcurement.
Click onSetup and Maintenance.
Click onPurchasing Line Types.
Create the Purchasing Line Type:
Click on theCreateicon (+ icon).
Enter the Purchasing Line Type Information:
Name:Enter 'PRCXX Computer Goods' (replace xx with 01).
Code:Enter 'PRCXXCOMP'.
Purchase Basis:Select 'Quantity-Based'.
Product Type:Select 'Goods'.
Category:Select 'Computer Supplies'.
Unit:Enter 'Ea' (for Each).
Description:(Optional) Enter a brief description of the line type.
Map Accounts:
Click on theMap Accountstab.
Select the appropriate accounts for the following:
Inventory Asset Account
Inventory Expense Account
Cost of Goods Sold Account
Click on theSave and Closebutton.
Save the Purchasing Line Type:
Click on theSavebutton.
Verification:
The Purchasing Line Type 'PRCXX Computer Goods' (replace xx with 01) should now be listed in the Manage Purchasing Line Types page.
You can verify the details of the line type by clicking on it.
The purchase basis,product type,category,unit,and mapped accounts should be displayed as specified above.
Additional Notes:
Make sure to replace 'xx' with your allocated User ID (01) in both the Purchasing Line Type name and code for consistent naming convention.
Mapped accounts define where the financial transactions associated with this line type will be posted in the General Ledger.
Carefully review the mapped accounts to ensure they are aligned with your organization's accounting practices.
Are You Looking for More Updated and Actual Oracle 1Z0-1065-23 Exam Questions?
If you want a more premium set of actual Oracle 1Z0-1065-23 Exam Questions then you can get them at the most affordable price. Premium Oracle Cloud exam questions are based on the official syllabus of the Oracle 1Z0-1065-23 exam. They also have a high probability of coming up in the actual Oracle Fusion Cloud Procurement 2023 Implementation Professional exam.
You will also get free updates for 90 days with our premium Oracle 1Z0-1065-23 exam. If there is a change in the syllabus of Oracle 1Z0-1065-23 exam our subject matter experts always update it accordingly.